Mountain biking is a fun activity that requires skill and technique to make it enjoyable. But do you know that a little change made to your bike can optimize your riding performance? For example, you can set up the cockpit of your bike to get better control of the bike. If you are looking for a tutorial on how to install mountain bike handlebars, this article is tailored for you.
What are Handlebars?
There are three points of contact as cyclists ride their bikes. Those three points are cyclists’ rear end, hands, and feet. By means, cyclists have to pay attention to their choice of saddle, handlebars, and paddle to enhance their riding experience to the ultimate comfort.
Bike handlebars serve the purpose of steering control, supporting a portion of cyclists’ weight, and provide a convenient mounting place for brake levers, shift levers, and other accessories like a bell and cyclocomputers.
Generally, there are few types of handlebars especially designed for particular riding style, for example:
Drop Handlebar
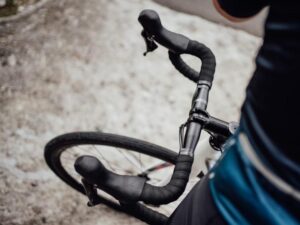
One of the most popular handlebars that are often found in road bikes, track bikes, and gravel bikes. This type of handlebar features a straight central section attached to the stem where each of its ends curves forward and down then back towards the rider at a lower position.
Flat Handlebar

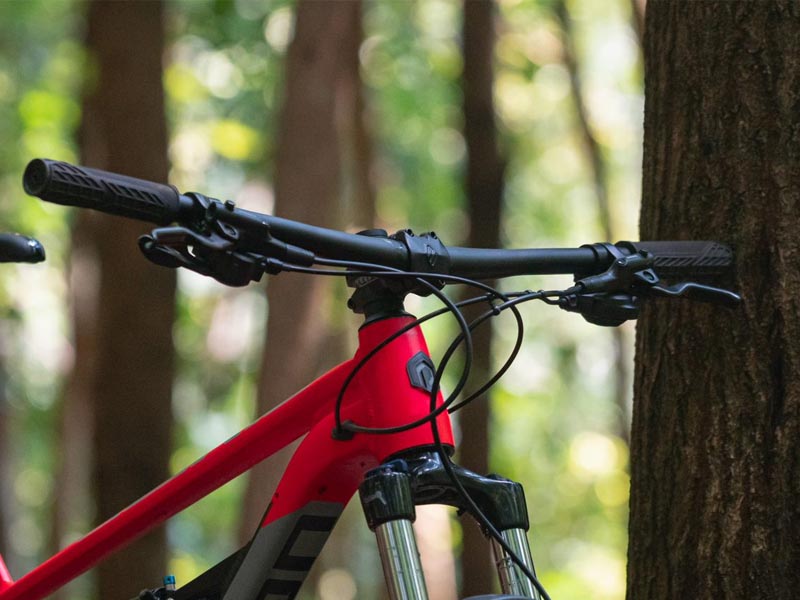
The standard handlebar you can usually find in mountain bikes, hybrid bikes, and the most recent fixed-gear bikes. The characteristic of a flat handlebar is having a nearly-straight tube and often bent towards the riders. There is an angle between the slightly swept-back ends of the handlebar and the axis of the stem clamp which is often addressed as flat handlebars or mountain bike handlebar sweep angle.
A riser bar is one flat handlebar variation with the characteristic that the outer sections of the bars rise from the center to the clamp area by around 15mm to 50mm. Another variation is the BMX handlebar which is often used on BMX bikes that have more rise than normal straight bars and usually come with a cross brace to provide strength and rigidity.
Handlebars are built in different materials including carbon fiber, aluminum alloy, and steel. Each of the bar materials had its advantages, for example, the carbon fiber material is lightweight, the steel material is stronger and more rigid, while the alloy is more light than a steel material yet still serves the rigidity. The handlebars of the Polygon mountain bike are mostly made with alloy material.
Besides the material, when choosing comfort handlebars for mountain bike, it is important to ensure the bar diameter is the same as the stem clamp diameter. The most common sizes found for flat handlebars are 22.2 millimeters, 25.4 millimeters, 31.8 millimeters, and 35 millimeters.
You can measure right on where the stem will clamp with a metric caliper to determine the bar diameter but make sure to measure it accurately. For the clamp diameter, you can check whether or not it is engraved on the stem as some manufacturers will label it there.
By changing the handlebars, riders will also change the look and feel of their bike. For example, changing mountain bike handlebars to cruiser handlebars, will improve comfort but hurt the maneuverability with the change of bike’s geometry.
Handlebars Removal
Now before changing the handlebar to the one that suits you best, you will have to begin by taking note of the positions of your controls by taking pictures from different angles or recording them in a video format for later reference. You can also measure and note down the distance between each component so you will get the correct measurement that offers you the utmost comfort positions.
Once you have finished taking notes, you can start removing the grips, brakes, shifters, bells, and any other accessories installed on your handlebars. Here are tips to remove the handlebars from different types of stem:
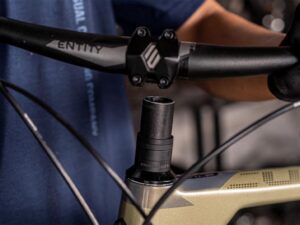
Removable Faceplates Stem
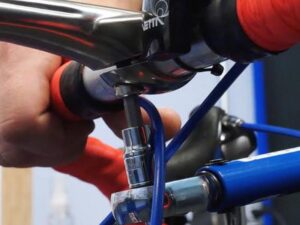
If your handlebars come with removable faceplates on the stem, you can simply loosen the faceplate bolts evenly before removing the faceplates and bar. Make sure to hold the bar when you are loosening the bolt until the last bolt has been successfully removed, the bar will be free to be taken down.
For a mountain bike that has an electronic shifting system with an internal routing inside the handlebars, you will have to remove the wire after the bar is separated from the stem.
Compression Slotted Stems
If your bike stems are using the compression slot with a single bolt at both top and bottom which holds the bar to the stem, you can loosen the bolts that secure the bar to the stem before sliding the bars out for removal.
Handlebars Installation
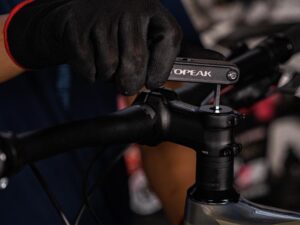
After removing your old handlebar, it’s finally time to install the new one. Ensure you have wiped the bar, stem body, and faceplate clean using either a clean rag or paper towel. You can also consider applying thread locker or grease to faceplates or compression slot bolt threads.
If you are using an electronic shifting system with an internal routing inside the bar, you will have to begin by routing the cable through your new handlebar. Once done, generally, for all types of stems, here are the proper installment steps you will have to do:
- Ensure your handlebars are centered in your stem;
- Rotate your handlebars to achieve the maximum rise;
- Tighten the stem faceplates bolt in an X-pattern to keep it balanced;
- Make sure the gap between stem and faceplate is even on top and bottom;
- Install your grip once the bar is in place.
For the note, when you are rotating the bar and aiming for a maximum rise, you will have to make sure that the mountain bike handlebar roll is not too far forward as we want to avoid the back-sweep becoming an up-sweep and straightening the ends of the bar. You will also have to ensure not rolling it too far backward as well else, it will have the effect of flattening ends, pushing the bars too far rearward.
For removable faceplates stems, what you will have to do is:
- Place the bars in the stem;
- Place the faceplates over the bars;
- Thread the bolts evenly until they can hold the bar in the stems.
As for the compression slotted stems, you will have to make sure that the stem bolts are sufficiently loose before inserting the bar. After that, thread in the compression slot bolt so it can hold the bar in the stems.
Conclusion
When we talk about the handlebar setup, the topic of handlebar height also can’t be ignored. Sometimes, cyclists complained about feeling uncomfortable around the neck area post-riding. If you are also feeling this kind of discomfort, don’t ignore the sign, it’s time to consider setting your handlebar height.
Although often overlooked, finding the right height for your handlebar is just as crucial as determining the perfect saddle height and considering the investment in the best saddle materials.
Back in the day, many people believed that mountain bike handlebar height relative to seat. Well, if we want to discuss the height of a handlebar, the terminology you will have to be familiar with is only about stack and reach.
Stack is a vertical distance measured from the center of the bike frame’s bottom bracket to the center of the top of the head tube while the reach is the horizontal distance of the same measurement methods. Debunking the myth, the mountain bike handlebar reach has nothing to do with either position of seat or grip.
So what kind of change can a 40mm rise handlebars offer to riders? It gives you a more comfortable riding position with the head more open and chest higher. It also allows riders to be more centralized during the ride on steeper trails, spreading the weight more between legs and arms so that the riders will feel less fatigue.
Are you looking for a well-performing bike to begin your cycling journey? You might want to give Polygon bike a chance. Polygon bikes are manufactured with an advanced ACX carbon or ALX alloy material which is guaranteed to be more lightweight and durable than any of their competitors. Equipped with the high-quality Shimano groupset, Polygon’s pricing is something hardly beatable by other brands.
Get the original piece of Polygon bikes and many other bikes, parts, accessories, and apparel from renowned brands only at Rodalink. By purchasing from Rodalink, you will not only get a high-quality product at a competitive price but also save time from assembling the bike on your own because Rodalink will have them delivered to your doorstep in ready-to-ride form.
Should you need any adjustments or maintain your bike, Rodalink also has a one-stop cycling shop with a professional team ready to assist and offer the help you need.
You can also register to become part of Rodalink community members to get the exclusive special deal and many more benefits. Collecting the points from each purchase which you can later redeem as a discount voucher. Visit Rodalink now and bring home your dream bike without having to break your bank account.