
Every mountain biker will be familiar with suspension on their bike. However, not every one of them knows how to adjust mountain bike suspension and make the best out of it. This should be okay, though, especially if you are just joining the community.
So if you are wondering what a mountain bike suspension is doing on your mountain bike and frequently asking yourself about “how do I adjust my front fork suspension” to make your bike feel as new with better control over your bike, this article is made for you so enjoy it.
What is Mountain Bike Suspension?
Mountain biking activities are often done in rough and more technical terrains where bumps and buzz are common things that happen. A suspension role is to allow riders to have a more comfortable ride around the irregularities by “flattening” it out and absorbing the vibration.
If riders have the suspension tuned correctly, it will allow a good bike to have a great performance. On the other hand, if you don’t know how to adjust front suspension on a mountain bike or understand how to adjust rear suspension on a mountain bike, no matter how great your bike quality is, you will still have to expect a terrible riding experience.
Best Dual Suspension MTB Singapore


EXPLORE QUALITY FULL SUSPENSION MOUNTAIN BIKE
Adjust Mountain Bike Suspension
A kick start to adjusting your mountain bike suspension is getting done with:
Setting the Sag
Sag is the amount of suspension used when riders place their body weight, including riding gear, on their bike. What you need to know is that the majority of mountain bike suspension components are using an air chamber although the usage of coil spring instead of air is also a common sight.
For coil spring shocks and forks, riders may have to swap out springs to achieve the correct amount of sag. Then how to adjust air suspension forks and shocks? For air forks and shocks adjustment, riders will have to use a shock pump to achieve the correct sag setting.
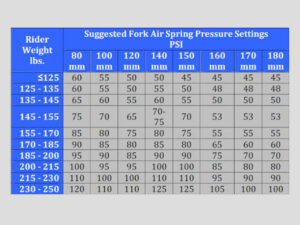
Depending on the suspension manufacturer, the mountain bike shock PSI chart recommended by each manufacturer might be different from one another. For example, you can look at Fox’s suspension fork pressure chart here:
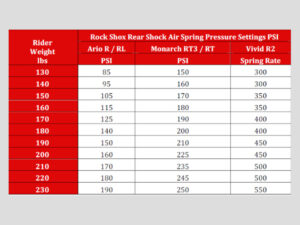
As for the mountain bike rear shock pressure chart, it is also determined by riders weight and you can refer to this picture below:
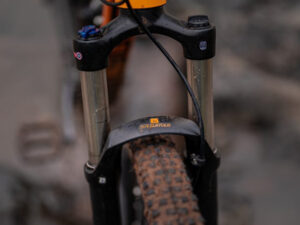
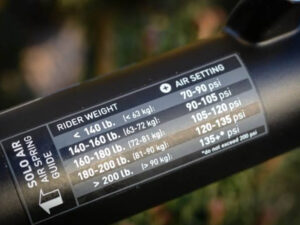
Usually, though, each manufacturer will have this recommended air pressure printed out somewhere around the suspension to help users get better guidance.
Now back to setting the sag on a common air shock, you can start by pushing the O-ring to the top of the stroke and then carefully sit on your bike before slowly standing up on your bike and seeing where the o-ring has landed to get the amount of sag you have. When you are standing up on your bike, make sure you have avoided bouncing the suspension to get the accurate amount.
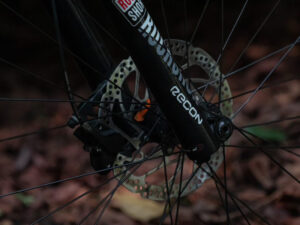
Once you are done with your shock, now you can move to your fork to set up the sag. The recommended fork sag varies from 15% to 20% and to measure the sag in your fork, it will be best to get someone to support you while you stand up out of the saddle.
If you don’t have anyone around to help you do this, don’t worry, because, unlike suspension adjustment motorcycle that has to be done with help, for bike suspension adjustment, you can try to ride on a flat surface while doing your best to place your weight on the fork without bouncing.
If your fork for example has around 120mm travel, the measurement of the MTB suspension setup calculator should work this way:
120mm * 15% = 18mm or 120mm * 20% = 24mm. So, your sag should be around 18mm to 24mm.
Adjusting Rebound
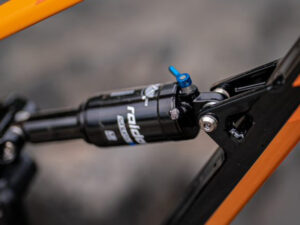
Once you have done setting your sag, you can move to adjust your rebound. This setting controls how fast or how slow your suspension returns or recovers after getting hits. Majority of the suspension components, the rebound is marked by the red dial at the bottom of the fork leg and shock body.
For some higher-end suspension components though, you will probably find both high and low rebound settings. But of course, this is not general. When you are setting rebound, please never use your friends’ settings and adapt it to your bike with wishful thinking it will also work perfectly fine for you.
Your rebound should be set according to the change in air pressure, the design of your suspension, and your riding style. If you set your rebound damping too high, your suspension will feel sluggish and the suspension will be hard to recover, causing it to pack up and feel stiff.
On the other hand, setting the rebound damping too low will cause the suspension to feel bouncy and out of control. So what you have to remember about adjusting your rebound is that less rebound damping = faster return speed and this setting is good when you need your suspension to recover quickly to keep your tire planted to the ground.
More rebound damping = slower rebound will cause the suspension to settle lower in its travel and offer more predictable ride quality.
Finding Fork Rebound
When you are adjusting the rebound of your fork, always start by turning it to the fastest setting with less rebound damping. Then stand next to your bike and push down on the bars to watch the fork quickly return to your hands and bounce the front tire off the ground.
From there, you can continue to add damping to your fork until the front wheel is no longer bouncing off the ground. Always keep in mind that your fork should always have a faster rebound setting than your shock so you won’t be bucked over the handlebars.
Setting Shock Rebound

After finishing the fork rebound, it is time to move to set your shock. Take note that the shock rebound needs to be set quick enough to let the suspension has time to recover, but not that fast until it kicks the rear end of the bike around.
On the opposite with the fork rebound, when setting the rebound of your shock, always start by turning it to the slower setting with maximum rebound damping and slowly remove the damping if you feel your shock is sitting too low on its travel and cause it to be stiff.
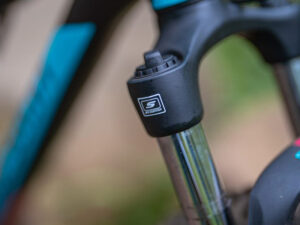
Compression

Most rear shocks (and some forks) have a built-in preset for compression damping. For example, the Fox forks and shocks often have a pedal platform mode with more compression damping and an open mode with less.
The pedal platform mode has more compression dumping, resulting in a firm ride that resists moving under pedaling but doesn’t give up sufficient suspension travel on bumps. While the open mode has less compression dumping, resulting in a supple, plush ride.
Random Suspension Pro Tips
Some tips you might want to know and will help you in a long run:
- Get your suspension maintained regularly;
- If your fork doesn’t have an o-ring, you can substitute it with a small zip-tie;
- Keep stanchion and fork/shock seals clean to increase the longevity of your suspension components but avoid using high-pressure water or air for cleansing;
- Create a suspension log that notes your air pressure, rebound, and compression settings as well as your maintenance intervals.
Last but not least, a bike can only perform well if the setup is correctly done. The price of your bike will not give out its best potential if you failed to adjust your bike accordingly. But anyways, if you are looking for a well-performing bike within an affordable price range, you might want to give Polygon mountain bike a chance.
Visit their official distributor, Rodalink to get the original piece. Don’t worry about the setup because you will get your bike delivered to your doorstep in ready-to-ride form and they also offer one-time free fine-tuning for the first three months starting from the purchasing date. So you will not have to worry about your bike suspension not performing well, because they will get it adjusted for you.
If you are looking for another type of bike, Rodalink is also ready to assist you. They have a wide range of bike selections so you definitely will find one that matches you most. You can also buy now and pay it later by using Shop Back as your payment method with a 0% of installment fee. Get your dream bike now and start your cycling journey with Rodalink.
Discover Cycling Needs at Rodalink Now!