Tire replacement is one of the standard maintenance for any bike owner. While some cyclists may prefer getting their bike to a workshop for thorough maintenance, some others find it more convenient if they know how to change a front bike tire and the rear tire of a bike on their own in case they get a flat tire in the middle of their offroad riding.
If you are one of the latter, consider yourself coming to the right article. Here, you will learn how to change a bike tyre in just a few simple steps. So make sure you read to the end of the article and have this page bookmarked so you won’t have to look for “bike tire replacement near me” through the internet when you are in the middle of the wood. Let’s get to the topic and hope you are enjoying your reading!
How to Change a Front Bike Tire
If you have rim brakes on your bike, you will first have to remove the brakes before changing your bike’s tire. You have to release the cable tension of the rim brake so you can easily remove your front tire off the bike.
Generally, to change a front bike tire, what you will need to do is:
- Remove the wheel from the bike frame by releasing your brake as mentioned above;
- Remove the old bike tube. In these steps, you will have to deflate your tube first entirely;
- If your reason for changing the tire is because of flats, find the causes of it by inspecting the wheel, tire, and tube;
- Patch or replace the tube depends on the urgency of the damage caused;
- Reinstall the wheel back to your bike frame.
How to Remove Front Bike Tire
As mentioned earlier, some bikes are equipped with a rim brake. The rim brake is mounted on the bike frame near the upper part of the wheel to enable it to squeeze two opposing brake pads against the rim of the bike wheel. Rim brakes are usually found on the front wheel. Hence, if you are going to remove the front bike tire, you need to take off the brake first. Here is what you should be doing to remove your front bike tire:
Release Your Brake
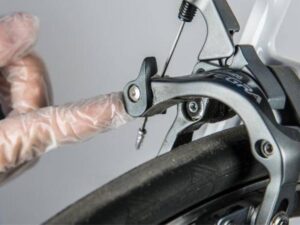
Usually, there will be a lever near the caliper used to release some cable tension and allow your brake pads to be far enough from the rim to help your tire to slide past them quickly. Once you have released the cable tension, it will be easier for you to remove the front wheel from the bike frame.
However, this brake release is unnecessary when you learn how to change a bike tire with disc brakes since the disc brakes are usually located near the wheel-axle.
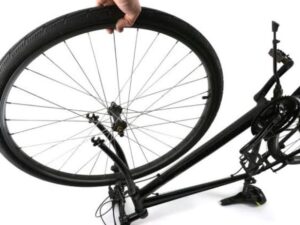
Flip Your Bike
If you need to remove your tire during an outdoor ride, carefully flipping your bike over will be more ideal. Let your bike rest on the seat and handlebars with the chain facing up for a better platform to work with and also reduce the risk of your bike falling over once the wheel is removed.
However, if you are changing your bike at home and are afraid flipping the bike might damage your bike seat and handlebars, you can consider investing in a bike stand. As long as your wheel and tire don’t directly touch the ground, both flipping the bike or holding it on a bike stand will work well.
Open Quick Release or Remove Axle
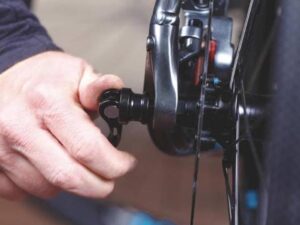
The quick release in the bike allows riders to remove the wheel without removing the axle and let the axle stay inserted in the hub. So, if your bike has a quick release, you only need to flip the lever into an open position and loosen the nut on the other side.
If the lever is tight, try to use a lever to pry it open and hold still the lever while loosening the bolt on the other side of the axle but refrain from removing the bolt entirely. For bikes with thru-axles, you can get the lever into an open position and then turn it in the counterclockwise direction to unthread the axle and remove it from the hub.
Lift the Wheel Up and Out of The Fork
In these steps, ensure you are not dislodging the calipers of your rim brakes bike. If you have disc brakes for your bike braking system, then you will need to be careful not to touch the rotor when you are opening the quick release mechanism to avoid getting your hands burned.
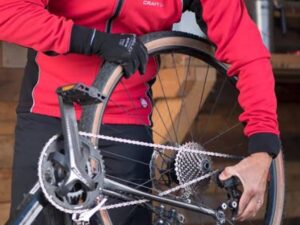
Remove the Tire from The Rim
First, you will need to deflate your tire. If you have Schrader valves, you can press down on the small pin in the center of the tire valve, and if you are using the Presta valve, you need to remove the plastic dust cap and turn the small valve at the top counterclockwise, then press it down to release the air.
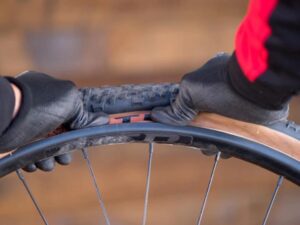
After you have deflated the tire, it will give you easier access to remove it from the rim. For cyclists looking at how to remove bike tire without lever, you can push the tire bead edge towards the center of the rim and work your way around before moving the beat of the tire up and outside the edge of the rim.
However, it will be much easier if you are using the tire lever to help you remove the tire, as you only need to hook the rounded end of one lever under the outer edge of the tire and hook the second lever next to the first one before sliding it in a clockwise direction around the rim. Once the tire is loose enough, pull out the tube.
How to Reinstall Front Bike Tire

You already know how to remove the bike tire. The next thing you have to do is replace your old tire with the new one and then learn how to put a bike tire back on the rim by following these steps:
- Put one bead back on the rim and leave the other side loose to make it easier to install the new one;
- Push the tire bead back onto the rim after the tube is in place and when the tire is completely installed;
- Check all around both sides to ensure the tube is not pinching between the tire and rim by pushing against the bead and look into the space between tire and rim to be sure it’s clear;
- Once done, you can inflate the tire with a bit of air and rotate the wheel to make sure the tire has adequately seated. In case there’s a spot where the bead isn’t sitting in the rim, you can let a little air out and push the bead back into the rim using your fingers and inflate the tire according to the recommended PSI;
- Guide your wheel back into the fork. If you have the rim brakes, be careful not to dislodge calipers when you are reinstalling the wheel and if your bike is using the disc brake, make sure you are guiding the rotor between the brake pads;
- A bike with quick release axle should have the wheel completely settled into the dropouts while ensuring the quick-release axle is positioned on the non-drive side of the bike, matching the wheel;
- A bike with a thru-axle should get the hub lined up with the holes at the bottom of your fork while the axle is pushed to the opposite side of the threaded fork. Afterward, turn the lever clockwise to thread the axle into the fork and push it to the closed position once it is tight enough;
- Reconnect your brake cable (for the rim brake’s bike) and tighten it properly;
- Lastly, spin your wheel to ensure the brake pads are not rubbing the rim or the rotor. If your bike wheel doesn’t spin, flip your bike back over and retighten the axle.
Conclusion

Changing tires is one of the essential skills every cyclist should know so you won’t be stranded in the middle of your outdoor riding because of a flat caused by a tire’s contact with a sharp object which is quite inevitable.
While it is possible to remove and replace the bike tire without tools, you are still recommended to prepare the wrench and tire levers on your backpack before heading for outdoor riding. The step-by-steps listed above can be your guide when the emergency comes. It is not merely a lesson on how to change Polygon bike tires but all kinds of bike tires in general.
If you are new to the cycling world and not sure what to do with your biking preparation, you can visit Rodalink and have your bike checked at their one-stop cycling shop so you can be sure that your bike gets the proper setup and is ready for a ride.
You can also find various types of bike accessories, parts, and apparels that you will need to carry as your biking gear. Aside from that, if you feel like upgrading your bike to some other type of bike with lightweight material and high-quality components at an affordable price, Rodalink should be able to fulfill your request.
Rodalink also partnered with Shopback, which allows their customers to buy the bikes they need and pay for them later with 0% of the installment fee. You don’t have to worry about the originality of every product you purchase from Rodalink because they are the official distributor of Polygon bikes; hence, you will be given the original product only.
Another benefit of purchasing through Rodalink is you don’t have to worry about not being able to put your bike together because the team at Rodalink will help you assemble the bike before delivering them to your doorsteps.
In short, you will get your bike in the ready-to-ride form and be granted free shipping if you purchase non-bike products for SG$200 or more. So what makes you wait? Grab your dream bike and biking essentials only at Rodalink.