
Whether you want to purchase a new mountain bike or you are planning to custom a mountain bike on your own, looking for a bike in fitting size is essential. If you have accidentally owned a bike that is not your size, don’t get panicked, and look at this article about how to fit a mountain bike.
Let’s learn how to determine the size of a mountain bike and what you should do to adjust your mountain bike to a fitting size for a more comfortable ride throughout this page. Consider bookmarking this site and enjoy the reading!
How Mountain Bikes are Sized
To achieve comfortable riding, the first thing you should pay attention to is finding the correct bike sizing. While different manufacturers might size their bike products differently, the measurement is most likely the same.
Most manufacturers will measure the frame from the center of the crank axle to the top of the seat tube. Usually, mountain bikes come in standard sizing in small, medium, and large sizes, just like apparel. Bike manufacturers often include size charts that list a height range for each bike size to make it easier for riders to choose the fitting size of their bike.
Key Indicator to Find a Mountain Bike in Correct Sizing
As a beginner, there are a few key indicators that you should be paying attention to before using the mountain bike fit calculator to determine your perfect sizing bike. The said indicators are:
Effective Top Tube and Reach
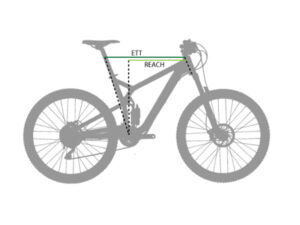
The effective top tube of a bike is measured by the horizontal distance between the head tube and seat tube without minding whether the top tube type is straight or sloped down. The effective top tube is one of the good indicators that determines the feel of bike length when riders are in seating positions.
Reach, on the other hand, is measuring the distance from the center of the bottom bracket to the center of the head tube in a horizontal line and has become a more popular way to measure the length of a mountain bike since it determines how long a bike will feel when riders are out of the saddle as a common position when descending or climbing the steep singletrack.
The Standover Height
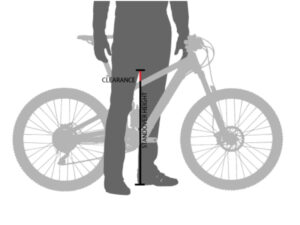
The stand-over heights of a mountain bike tend to be lower than a road bike. Besides, the amount of clearance needed for each bike may differ depending on the slope of the top tube towards the rear wheel. Hence, the inside leg measurement is not extremely important when determining the MTB bike fitting chart, and the stand-over measure doesn’t frequently use to size the bike.
However, knowing the stand-over height can also be a helpful indicator when you want to know whether there are signs your mountain bike is too big or too small for you.
You can measure it by straddling the mountain bike with your feet flat on the floor and making sure there’s a 2″ minimum clearance between the tires and the ground when you are lifting the mountain bike. If you are the typical aggressive rider, you can opt for 3″ to 5″ clearance.
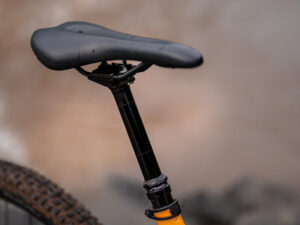
The Seat Height

A rider needs to get the seat height to be adjusted accordingly, so they can accurately feel their bike. You can ask for assistance from the bike shop sales team to help you hold the bike upright while hopping on the saddle.
If you are riding over flat terrain or climbing hills, you might need a slight leg bend that reaches about 80% to 90% of full-leg extension with the foot at the pedal stroke to allow you to pedal efficiently while powerfully using your major leg muscle.
On the other hand, if you are looking for a proper position for descending, you can consider lowering the seat to about 3″ from the actual height you’ve set for climbing hills or riding over flat terrains.
How to Fit a Mountain Bike
From the point mentioned above, you should already get the main idea of what indicator you should be looking after to find the perfect sizing bike for your comfortable rides. But what if you have already gotten a bike before and finally realize it doesn’t quite fit you? Stop panicking and try out these tips instead:
Setting the Saddle Height

First, cyclists, especially beginner cyclists, should know that the wrong saddle height will lead to sore knees or hips and reduced pedal power. To adjust the saddle height to the perfect fit, you will need to loosen the saddle clamp, wiggle up or down the seat post, align the saddle with the top tube, then re-tighten the clamp.
Setting the Angle and Position of the Saddle
It is common for riders to prefer a saddle at a horizontal angle or slightly nose-down. In a rare case, full suspension bike owners will like to have their bike saddle nose steeply pointed down as compensation for a change in the angle while the rear suspension squats into the travel during the climb.
To adjust the angle and position of the saddle with a twin-bolt seat post, you can loosen the rear bolt so you can angle down the nose or the front bolt to tilt it up. You can slide the saddle forwards or backward as the bolt loosen up. Once done, tighten up the other bolt until you get your desired angle. Lastly, tighten both bolts alternately until they’re torqued tight enough to stop the saddle from creaking.
Adjust the Handlebar Height
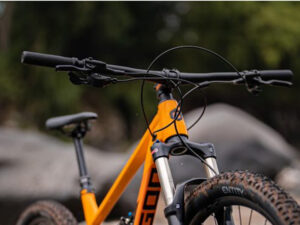
Handlebar position will determine the comfort position of riders. So, if you wish for a more upright and comfortable riding position, you must know how to adjust reach on mountain bike handlebar.
First of all, raising the handlebar will allow riders to get their weight back on steep descents and enable you to push the front wheel into holes and down slopes efficiently. However, you will have to beware and not adjust it too high since it will make you struggle to get enough weight over the front wheel on steep climbs or flat turns.
To deal with it, you can remove the top-cap bolt and loosen the stem-clamp bolts enough to slide the stem off. To increase the bar height, swap spacers to below the stem and refit the stem, and tighten the top cap just enough to stop it from moving.
Set the Bar Roll
The experiment with bar roll can also improve riders’ on-bike position. You can start with the bar tips pointing a few degrees up from the horizontal position, then loosen the top two stem faceplate bolts so you can rotate the bar. Last, look at the bar horizontally and adjust until the tips point up from the horizontal before re-tighten it to the stem maker’s specs.
Adjust the Brake Lever Position
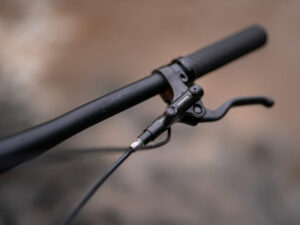
You can loosen the brake lever clamp bolt in an anti-clockwise direction to freely slide the lever body along the bar. Then, work on the shifter or dropper-post remote so that you can move the brake lever around.
Place your hand naturally on the grip and find the position where you feel the most comfortable for your index finger to sit around the outboard edge of the lever blade to get the maximum leverage. After that, you can tighten the clamp bolt just enough to keep the lever in place yet loose enough for the lever to be rotated around the bar.
Once done, you can work to set the lever angle. You can start with around 30 degrees below horizontal and adjust it according to your personal preferences. After you find the satisfying position, you can re-tighten the clamp bolt. Remember to set the other lever symmetrically.
Conclusion

Getting the right fit for your mountain bike will increase your performance during the ride and lower the risk of injuries. For a beginner, consider paying attention to the few indicators mentioned above before purchasing a bike.
However, if you are utterly clueless about what you should be doing so that you will have the perfect sizing bike for your mountain bike fitness activities, you can consult the riding style you have and entrust the bike shop sales to help you pick the bike for you.
For a recommendation, we would like to suggest you visit Rodalink. There, you will not have to search for “where to find mountain bike fitting near me” on the internet anymore because Rodalink comes with a one-stop cycling shop handled by a professional and experienced team that will gladly assist you in finding the proper bike according to your needs.
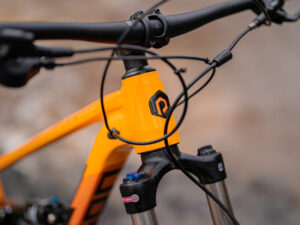
Besides, at Rodalink, you can find the best-performing mountain bikes at affordable pricing, for example, the Polygon mountain bike. The Polygon mountain bike ergonomics design matches with high-quality components from top brands like Shimano for the drivetrain and FOX for the suspension, which guarantees you the best experience in mountain biking.
On top of that, Polygon bike manufacture all of its own. Every production undergoes strict quality controls before being marketed, guaranteeing consumers get only the most excellent product that is lightweight and more durable compared to other brands with the exact specifications.
Rodalink, as their official distributor, is helping to ensure riders find their dream bike that will work best according to their riding style and height. You also don’t have to worry about breaking your savings to support your hobbies because by becoming part of Rodalink community members, you can get special offers and deals.
Rodalink is also partnering with Shop Back to allow you to buy your desired bike now and pay for it later with a 0% of installment charge. All your worries are covered. Now, it’s time to chase your mountain biking dream along with Rodalink.